How to Prepare Your Walls for Painting
People who want to update their room or change their house need to learn how to prepare walls for achieving a durable paint finish. Homeowners in Surrey need to focus on surface preparation because their properties consist of Victorian terraces with solid plaster walls and modern constructions which use plasterboard.
The painting process will produce substandard results when you skip this vital step because your expensive paint will develop irregular patterns and start to peel ahead of schedule.
Several home decorators in Surrey failed their painting projects because they did not prepare their work surfaces properly before starting their work. Our guide offers UK homeowners a professional multi-step system which demonstrates all home preparation stages while we explain the purpose of each step and the common mistakes Surrey residents make.
Why Wall Preparation Is Non-Negotiable
Every surface reveals its true nature when you apply paint because paint acts like a mirror which shows all the flaws present on the surface. The surface imperfections will become visible because dust and grease and cracks and uneven areas will appear after a few weeks.
The Decorators’ Handbook from Dulux explains that surface preparation mistakes cause most paint failures which reach about 80% of all cases instead of being caused by poor product quality.
Surrey faces several challenges which prevent older residential properties from developing their complete potential.
- Hygroscopic salts from rising damp
- Homeowners who live in houses built before 1950 must deal with flaking issues which arise from distemper paint.
- The plaster becomes fragile because of its old condition or because water has damaged it.
Modern home construction faces multiple challenges because builders do not prepare plasterboard correctly and they fail to fill all joints and construction debris prevents paint from sticking to surfaces.
Step 1: Clear the Room and Protect Surfaces
The first step of your process requires you to remove all furniture along with every curtain and wall decoration piece. If items can’t be moved, group them in the centre and cover with heavy-duty dust sheets.
Next, protect:
- Floors with rosin paper or builder’s plastic (taped down to prevent tripping)
- Light fittings and sockets (turn off power at the fuse box first, then remove covers)
- Skirting boards and door frames with low-tack masking tape
The method allows me to keep my workspace clean while I prevent any damage to original home elements which need protection during work in older houses.
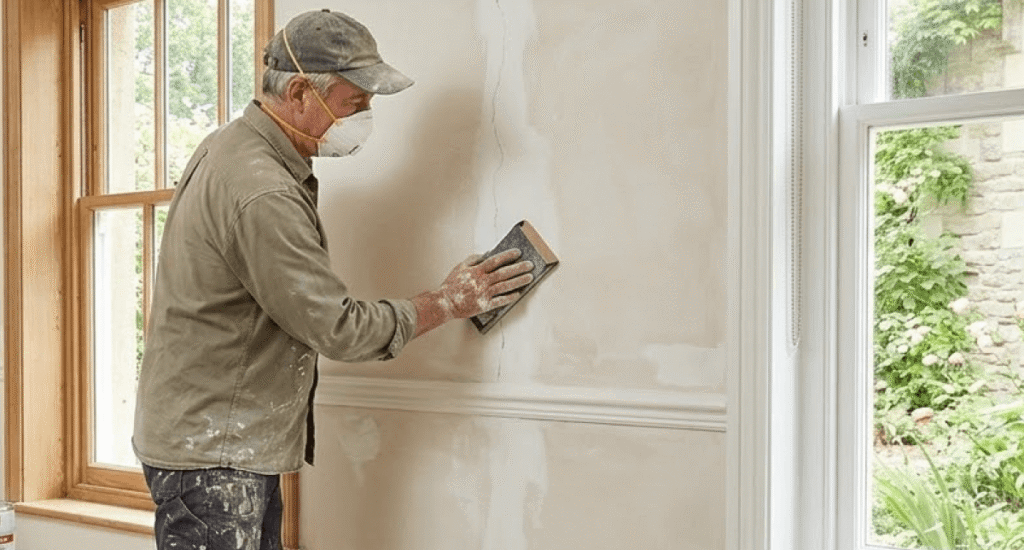
Step 2: Inspect and Repair Imperfections
Look for:
- Hairline cracks in plaster or filler
- Nail holes and dents from picture hooks or fixtures
- Loose or bubbling paint (scrape gently with a filling knife)
- Stains from water, nicotine, or mould
Repair Process:
- You need to create a “V” shaped groove by slightly widening the cracks with a scraper because this technique enables the filler to adhere better.
- The repair requires an interior filler which works for deep holes and fine cracks by using Toupret and Polyfilla products.
- Sand smooth once dry using 120–180 grit sandpaper.
- You need to wipe off all dust particles by using a damp sponge or tack cloth because leftover dust particles will cause your work to fail.
Pro Tip: In older homes, test for distemper paint (chalky, water-soluble coating). If present, it must be fully removed—painting over it guarantees failure.
Step 3: Clean Thoroughly
Kitchens develop hidden dirt because they store grease while hallways gather hand marks and bathrooms develop soap scum deposits. The residue creates a barrier which stops paint from bonding properly with the surface.
Cleaning Method:
- Mix sugar soap with warm water (follow manufacturer’s dilution ratio).
- Wash walls from top to bottom using a sponge or soft brush.
- Rinse with clean water and allow it to dry completely (usually 24 hours in typical UK conditions).
Never skip this step-even new plasterboard has factory dust that repels paint.
Regulatory Note: While not mandated by law, thorough cleaning supports compliance with BS 6150 and ensures warranty validity on premium paints.
Step 4: Prime Problem Areas
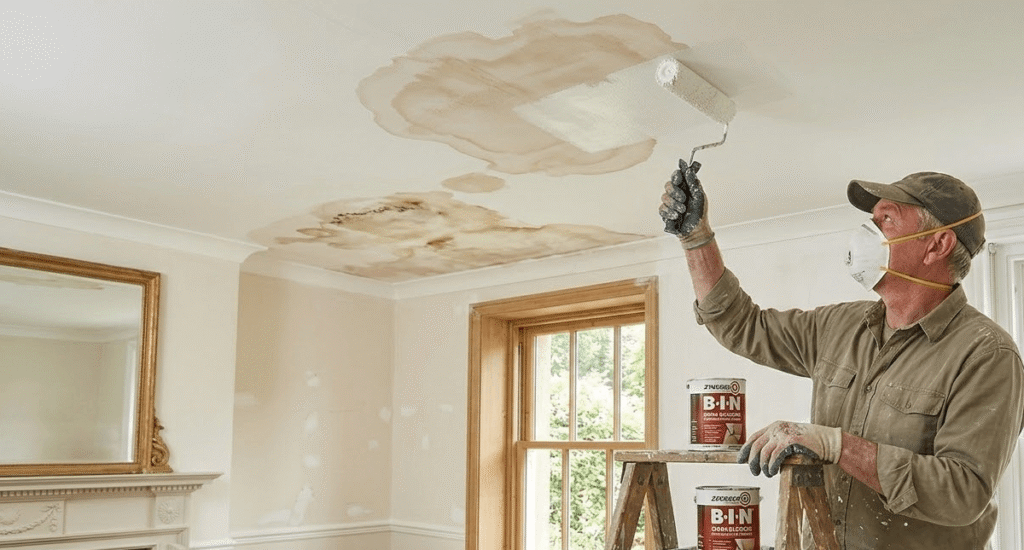
Not every wall needs full priming-but certain zones do:
| Issue | Recommended Primer |
| Bare plaster or filler | Mist coat (30% water + 70% matt emulsion) or dedicated plaster primer |
| Water or nicotine stains | Stain-blocking primer (e.g., Zinsser B-I-N) |
| Mould-affected areas | Fungicidal wash followed by anti-mould primer |
| Previously stained timber | Sealing primer to prevent bleed-through (as detailed in our woodwork paint spraying guide) |
Priming seals porous surfaces, ensures even colour, and prevents future issues like tannin bleed or salt efflorescence.
Step 5: Address Damp and Ventilation (If Needed)
You should never hide tidemarks or powdery residue or black mould by painting over them. These are signs of underlying damp-common in Surrey due to clay soil and high rainfall.
- Condensation: Improve ventilation (install extractor fans, open trickle vents per Part F 2022).
- Penetrating damp: Fix external defects (cracked render, blocked gutters).
- Rising damp: Consult a PCA-registered surveyor before redecorating.
The guide about damp-related paint problems shows that treating surface symptoms without fixing the underlying problem will waste your time and money.
Step 6: Final Dust-Down and Dry Check
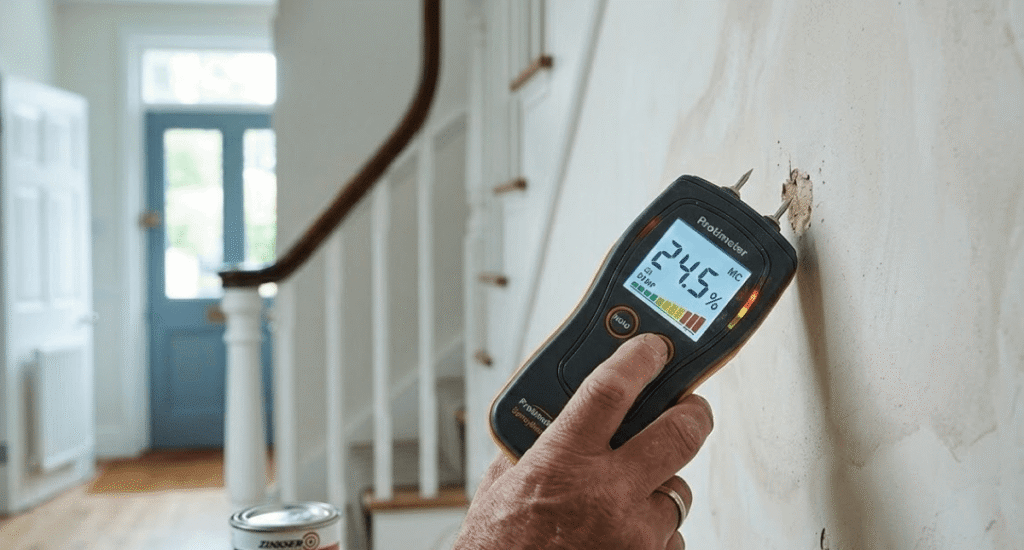
Before opening your first tin:
- Run a tack cloth over all surfaces to remove fine dust.
- Use a moisture meter on suspect walls—plaster should read below 15% moisture content.
- Ensure ambient temperature is above 10°C and humidity below 80% for optimal drying.
Cold and damp weather conditions for painting cause the drying process to take longer while the paint develops poor surface structure and mildew begins to appear.
When to Call a Professional
Small rooms let homeowners perform their own tasks yet Surrey Painters becomes essential when:
- Your home is listed or in a conservation area (special techniques required)
- You’re dealing with extensive damage or historic finishes
- You want spray application for ultra-smooth results (ideal for large, flat walls)
Our team includes full prep in every quote-filling, sanding, cleaning, and priming-so your finish looks showroom-perfect from day one.
Related Reading:
How to Prepare Your Home for Interior Decorating
New Build Decorator’s Checklist: Surrey Homeowner Pitfalls
Final Thoughts
The process of wall preparation before painting lacks any visual appeal yet it serves as the base which all excellent paint finishes begin with. The process of cleaning and repairing and priming will deliver you a result which combines beauty with strength and full compliance and genuine value for your work.
The residents of Surrey need to create housing solutions which match their particular needs because the area contains multiple types of residential properties. The basic guide gives you all needed information to manage your walls through every rainy season that follows.